How to Insulate a Cargo Trailer
Cargo trailers, whether those used as 18-wheeler rigs or vehicles needing no special operator's license, tend to be hard-sided units skinned in aluminum sheeting and made rigid with support hoops and rails. The supports are usually approximately 1 1/4-inch deep. This structure lends itself well to the installation of insulation.
Step 1
Remove any preexisting paneling or liner from the inside of the cargo trailer. Clean the walls using a 10-to-1 dilution of dish washing detergent, then rinse with clean water.
Step 2
Create a vapor barrier to protect the finished project from condensation that can form in extreme temperatures. Proprietary vapor barriers are available in the air conditioner aisles of home improvement warehouses. An extremely efficient and cost-effective alternative is to glue sheets of bubble-wrap to the inside of the cargo trailer's skin. Some rigid insulation panels are supplied with an integral vapor barrier; if using these products this step should be ignored.
Step 3
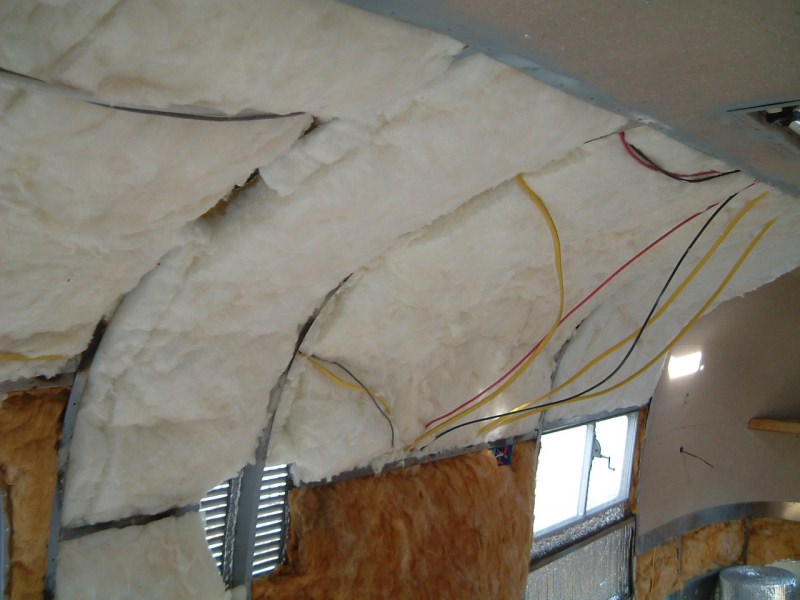
Install batt -- sometimes called blanket -- insulation, commonly available in 18- and 24-inch widths. Apply a proprietary glue to one section of inner wall at a time. Unroll the batts on the floor and cut them to size with shears. Press them into position over the glue. Leave the bottom 2 inches without insulation to create an area into which condensation can settle, and provide drainage from this space. Batt insulation is a cost-effective option for walls, but cannot be attached to ceilings.
Step 4
Install fire-resistant rigid panels made of fiberglass or polystyrene. As soon as possible --- usually when the space between each support hoop has been filled with batt --- install the interior panels to help hold the batts in place. Panels finished on one side with a silver-colored metallic coating help to reflect external heat back out through the cargo trailer's skin. Cut the panels to the sizes dictated by the cargo trailer's support hoops and rails. Brush proprietary glue over the walls and press the panels into place. Again, leave the bottom 2 inches without insulation and provide drainage from this space.
Step 5
Panel the interior according to the trailer's predicted use requirements. If light, pre-packaged cargo is anticipated, use 8- by 4-foot sheets of luan plywood cut to size; if heavy use and palletized cargo is anticipated, use sheet steel or aluminum. Both types of paneling should be attached to the support hoops and rails using either self-tapping machine screws or blind rivets.
Step 6
Insulate the floor by installing a new layer of wooden flooring over the preexisting floor.
Paint the outside of the trailer roof with insulating paint available from most home improvement warehouses and recreational vehicle dealerships.
Tips
- Roof vents such as those used in recreational vehicles allow heated air to escape.
- Insulation is rated in "R-values;" the higher the R-value the greater the product's insulation capabilities.
- Heavy carpet is also an excellent insulator for trailer flooring, but only if the cargo is unlikely to leak fluids and doesn't require forklifts to maneuver.
Warning
- Neither loose-fill or expanding foam insulation is a viable option when retrofitting a cargo trailer.
Items you will need
- Cleaning solution
- Rinse water
- Vapor barrier
- Insulation material
- Glue
- Lining
- Fasteners
- Flooring
- Insulating paint
Trailer Insulation is one of the first steps in any DIY build, and it’s also one of the most misunderstood. There’s a lot of misconceptions about trailer insulation, and people end up wasting money and time on unnecessary steps and products.
When we were building our trailer we had all kinds of questions about insulation: What’s the best material to use? How do we install it? Do I need a vapor barrier? What questions do I not know enough to ask?
So what is the best way to insulate a DIY horse trailer? Below, we’ll go over how heat is transferred and how to stop it; discuss what you need to know about insulation, look at some of the different products available, and how best to use them.
There are three types of heat transfer: radiation, conduction, and convection.
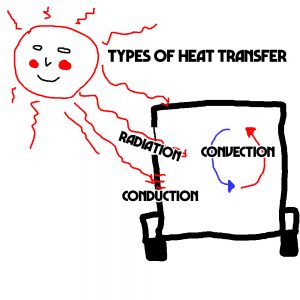 Radiation is heat that can be transferred through the air or a vacuum – Think of the warm sunlight that comes through your windows on a sunny day. It’s very nice in winter but miserable in the summer. In a trailer, radiation occurs mostly through the windows. If you park your trailer with large windows in direct sunlight, the inside will heat up quickly. This is because radiant heat transfers easily through glass. Combat radiation heat by parking in the shade or extending your awning.
Convection is heat transferred through the natural movement of liquids and gasses. This is due to liquids and gasses being different densities and temperatures. In a nutshell, hot air is less dense than cold air so it rises which is why the nose of gooseneck trailer gets so hot in the afternoon. Combat convection by adding a ventilation fan to suck out the warm air near the ceiling while pulling in cooler air from a cracked window.
Conduction is heat transferred through a solid material. The metal skin and framing of your trailer walls are excellent conductors of heat. Without any insulation, a trailer sitting directly in the sun heats up fast. The inside metal can be too hot to touch because the heat is transferred very efficiently through the outside walls. Combat conduction by insulating the inside of your trailer to stop your trailer from conducting the sun’s heat inside during the summer and help prevent heat loss through conduction during the winter.
Trailer Insulation:
Insulation slows the rate of heat transfer into and out of your trailer, which makes it easier to maintain the temperature you want. A properly insulated trailer is easier to heat and cool. It won’t heat up as quickly in the summer, and stays warmer in cool weather.
Every insulation material has an R-value, which is a measure of the material’s Resistance to heat transfer. The higher the R-value, the better the ability to resist heat transfer via conduction.
Different materials have different levels of conduction. In general, the more porous a material is, the less it conducts heat because air is a poor conductor.
Example: If you hold a metal bucket full of ice, it will quickly draw the heat out of your hands. If you hold a foam bucket full of ice, the heat will stay in your hands.
NOTE: Nothing resists conduction better than a vacuum; this is why vacuum insulated mugs work so well.
A thermal bridge is an area that has greater thermal conductivity than the materials around it, providing an opportunity for heat to pass through.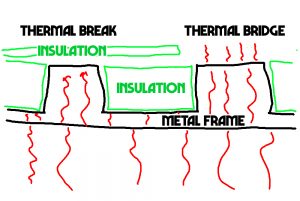
When you place insulation between your trailer’s frame ribs but don’t do anything to the ribs themselves, the frame then becomes a thermal bridge. Heat can conduct inside the trailer through the exposed frame much more easily than it can through the insulated areas. This thermal bridge reduces the overall effectiveness of your insulation, since heat and cold can easily go around it.
Insulating on the top of your trailer’s hollow frame ribs can reduce the effect of thermal bridging.
These thermal breaks, are basically non-conductive materials (i.e. insulation) placed in the pathway of a thermal bridge to block the flow of heat. NOTE: HVAC tape is not insulation.
Now that we understand how basic heat transfer works, let’s take a look at the insulation materials we can use to slow it down.
While there are a lot of options out there, not all of them are good choices for insulating your trailer. Good trailer insulation needs to have the following:
- High R-value per inch. Space is at a premium inside a trailer, and you want to insulate with materials that will do the most in the least amount of space.
- Bang for your buck. There’s no need to spend hundreds of dollars insulating your trailer. Some materials may work well, but cost more than your trailer did. The best insulation materials do their job effectively and are friendly to your wallet.
- Able to withstand vibration. Unless you’ve got your trailer up on blocks, you’re probably hauling it all over the place. Traveling causes lots of vibrations inside your trailer, and your insulation needs to be able to take it without falling apart.
- Resistance to moisture, mold, and mildew. Either the material is impervious to moisture (like rigid foam board or spray foam) or has moisture control properties and natural mold resistance.
- Non-toxic. You don’t want harmful gases or microscopic particles filling your living space. You get bonus points if the trailer insulation is produced in an environmentally-friendly way.
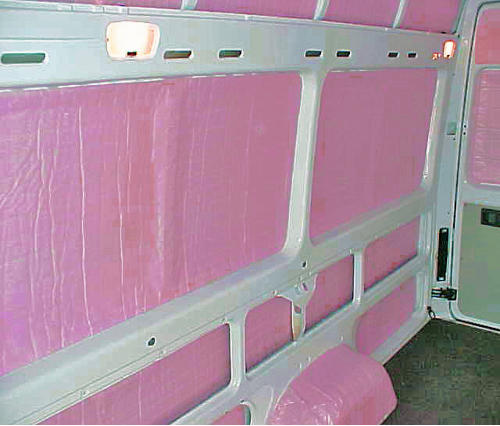
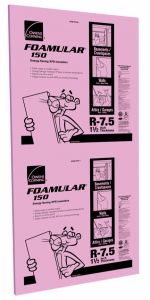 What we used in our trailer: Extruded polystyrene (XPS) is a type of rigid foam board insulation that’s widely available. You’ll recognize it as the big pink or blue foam sheets at the hardware store. XPS has a very good R-value per inch at R-5, and is impermeable to moisture. Another benefit is its high compressive strength, making it perfect for floor insulation.
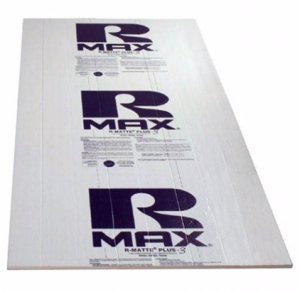 What we should have used for trailer insulation: Polyisocyanurate is another rigid foam board insulation. It typically comes foil-faced on one side, which acts as an effective vapor barrier and also provides a radiant heat barrier if you install it with an air gap. Polyiso is much more environmentally friendly and has a slightly better R-value per inch than XPS foam board. It is a little more expensive than XPS and my local hardware store didn’t carry it.
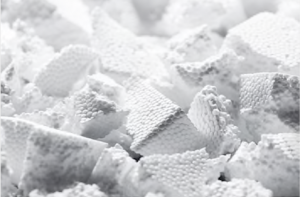 What you never want to use: Expanded polystyrene (EPS) is another type of foam board insulation. It’s basically the same as the stuff in your Styrofoam cooler. EPS is super cheap and is a good insulator. But it contains air gaps that allow moisture to penetrate, which degrade the material over time. It also won’t stand up to vibration as well as polyiso or XPS, and isn’t nearly as durable.
Trailer Insulation Steps by the Numbers:
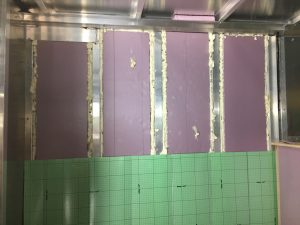
1 – Insulate walls, ceiling, and floor with foam board
2 – Fill gaps with spray foam
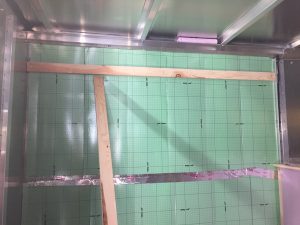
3 – Cover all exposed aluminum ribs with thermal break – We used ¼ inch fanfold sheathing insulation
 4 – Seal seams with HVAC tape to create moisture barrier
5 – Attach 1×3 wooden furring strips to ribs to create a solid base for the ¼“ plywood sheet walls and channels for electrical wiring
And there you have it! A fully-insulated trailer!
Now you’re ready to head up to Alaska in December, or haul down to Arizona in August. Well, maybe not. No matter how well-insulated your rig is, it’s still a good idea to follow the weather you want. While trailer insulation does make the inside of your trailer more comfortable, horse camping isn’t about staying in your trailer – it’s about getting out there and enjoying the world on your horse!
Remember at the beginning of this article how I mentioned that most trailers have a thin, flimsy layer of fiberglass insulation on the walls? Yeah, that’s no good. Even if you do the other four insulation tactics I suggested, you still might not be as comfortable as you can be.
By reinsulating your walls, you can rest assured that you’ve done all you can for temperature control in your trailer. I do have to warn you that doing this job yourself will probably void any type of warranty you may have. You might want to check with your trailer manufacturer if even a professional can work on your walls.
Once you get that out of the way, you have several materials to choose from for insulation. These are:
- Spray foam: For a simple DIY job, spray foam is great. Not only does it have a relatively high R-value (I told you that would come up again), but it comes in a canister or similar container. Then you apply it using the canister. Spray foam comes out looking like shaving cream. Once you let it settle, your walls are now insulated much better.
- Rigid foam: Then there’s rigid foam, which you can size just right by slicing it. This pink foam has a good R-value as well. You will need industrial tape or caulk for adhering the foam to the walls of your trailer. Rigid foam is known for its strength, durability, and moisture-fighting properties. Although I made it sound easy, this is a much harder job than using spray foam.
- Fiberglass foam: Perhaps instead of replacing the insulation you’re using outright, you can just add more. Fiberglass foam insulation isn’t all bad, after all. It has a good R-value and is adept at keeping cool air in the vehicle over the summer. Expansion occurs when fiberglass gets warm though, so you will have to change out this insulation every few years. Another downside is the potential for mold to get in the insulation. You’ll smell this before you see it, and by then, it’s too late to salvage in most instances. You’ll need to change out the insulation at that point.
| Type | Pros | Cons | Best for… | Avoid If… |
|---|---|---|---|---|
| Fiber-glass | Cheap, Easy to install/replace, High R-Value | Damaged by moisture, wears down over time | Single-climate RVers | You change climates often, spend time in areas of high-humidity |
| Rigid Foam | Long life-span, moisture-resistant. | Mid-to-low R-Value, difficult to install | Experienced RVers who change climates often | You cannot find an RV with this pre-installed and/or are not prepared for a DIY project |
| Spray Foam | Impervious to moisture, low-cost, lightweight | Low R-Value, may require professional installation | Lightweight RVs that mostly stay in one climate | You spend a lot of time in extreme hot/cold temperatures |
Fiberglass RV Insulation
Fiberglass insulation is the standard. It comes in most RVs right out of the factory, and for good reason. Fiberglass insulation is one of the best for maintaining temperature consistency, even in the face of extreme external weather. In other words, it’s the tried-and-true method of RV insulation.
This does not mean that it is the best, however. Though its higher R-value insulation rating is desirable for RVers who spend time in hotter or colder temperature zones, fiberglass insulation has the notorious drawback of having a much shorter lifespan than other forms of insulation. As moisture gets into the insulation, it begins to expands, reducing the R-value over time and causing the insulation to be less effective.
Also, because it is subject to moisture saturation over time, the insulation can also mold, giving the RV a musty smell and potentially having unhealthy side effects to those who spend too much time in the confines of the RV. It is for this reason that fiberglass insulation, the standard, is certainly not the best for those who take their RV to areas of differing temperatures on a regular basis. With RVing in changing climates, the moisture saturation of the insulation is expedited, making the process of reducing its R-value and potentially causing mold to accumulate in the walls faster.
- Pros: High R-value, cheap, standard on most new RVs
- Cons: Wears down over time, can be damaged by water, is susceptible to mold
- Who it’s best for: RVers who spend most of their RVing time in a single climate
- Who should avoid it: RVers who travel to various climates in a short period of time, RVers who frequent humid areas
Foam RV Insulation
Foam insulation comes in two major types, both having different styles and functions. These two forms are rigid foam and spray foam. Check out more below. See more of the differences between foam and fiberglass with this guide.
Rigid Foam
Rigid foam insulation comes in boards of varying thickness and can be cut to accommodate any space. Rigid foam has to be inserted into the walls in solid sheets to maximize its effectiveness and fastened firmly to the studs in the walls of the RV so that no airflow can get through it.
Though it has a mid-ranged, versatile R-value, installation can be difficult and may require additional tools – caulk, industrial tape – if you are doing it yourself. There are not many RVs that come with rigid foam installed, so it often has to be a DIY project, if you want the longevity of rigid foam.
- Pros: Long life-span, resistant to moisture, durable with high tensile strength
- Cons: Mid-to-low R-value, difficult to install, rarely comes pre-installed on new RVs
- Who it’s best for: RV customizers who like to outfit their RV themselves, experienced RVers who change climate zones frequently
- Who should avoid it: Novice RVers or those who do not want to crack open the shell of their RV for DIY work
Spray Foam
Spray foam insulation has a similar R-value to rigid foam, but is known for its simpler method of installation, though it is not simple enough to not need professional consultation if you are a novice to insulation. Spray foam is loaded in an applicator and then sprayed directly into the walls of your RV where other insulation would go. It requires no tape, no caulk, no fasteners; only the applicator and safety gear (and a little know-how).
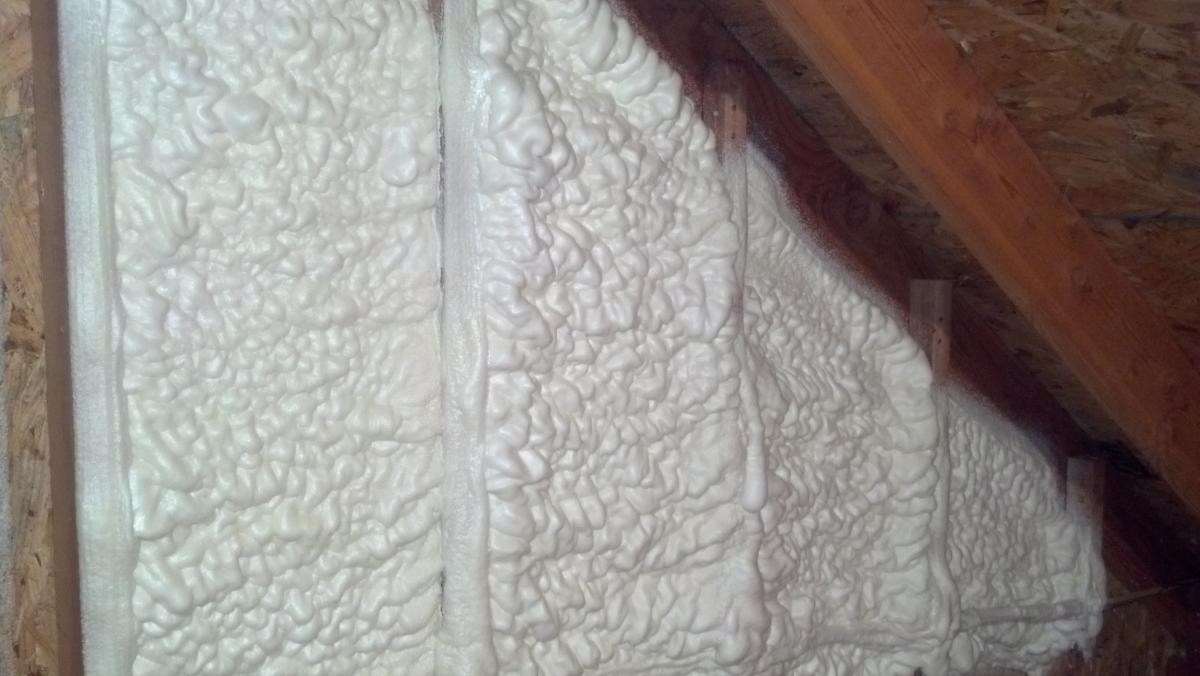
Spray foam seals the walls as long as it is distributed evenly and thoroughly to all areas inside the walls. The spray foam bonds tightly together with itself, creating an airtight barrier for temperature, moisture, and even some noise. However, it has a lower R-value than many forms of insulation, making its ease of application a double-edged sword. If you plan on spending time in hot climates or very cold climates, the insulation may not provide the temperature barrier that you would prefer.
- Pros: Long life-span, impervious to moisture, low cost, very lightweight
- Cons: Low R-value, can have a bad smell that sticks around for weeks or months after installation, may require a professional to install
- Who it’s best for: Those who spend time in mostly temperate locations, lightweight or ultra-lite RVs
- Who should avoid it: Those who spend time in areas of extreme temperatures
Spray foam insulation might be right for your RVing preferences. Check out more information about spray foam insulation here.
Which RV Insulation is Right For You?
It really depends on what your goals are as an RVer. There is no one to say which is the “right” kind of insulation because it all comes down to what is most important to you. Do you want your RV to be less insulated, but more impervious to moisture? Will you stay primarily in one climate when you are RVing? Are you alright with large DIY projects on your current or future RV that may require you to remove the siding? Find out more questions to ask by learning more about the science behind insulation.
When shopping for an RV, you can always find out the type of insulation being used and, in many cases, RV manufacturers and dealers will even advertise their R-values in the specs section of their sites. This means that you can pick out an RV with consideration to the type of insulation currently installed. Learn more about RV insulation and installation practices here.
Dear Chief: Unfortunately, this product will provide very little benefit in your trailer. First, the cotton backing is so thin that the R-value is just R-1.3. Second, reflective barriers only work with an air gap, so you cannot mount it against the aluminum ceiling. And if you managed to create an air gap, this would just become a more efficient solar heater. In short, this would be a total waste of money and time.
Trailers and campers are difficult to insulate because space is limited, and insulation R-value is measure per inch of thickness. Foam board provides the highest R-value -- but this option is out because foam board is flammable and emits toxic gas when it burns, a major risk in a confined space. Plus you must install an approved 'thermal barrier' over foam board; the standard is 1/2" drywall, which obviously will not work in a trailer or camper.
Here are some suggestions:
The best option is to fill the spaces between the aluminum frame with standard insulation. Three photos are attached showing the bare frame and shell, the space filled with fiberglass, and the new interior surface attached over the frame. We prefer Roxul rock wool rather than fiberglass, however, because it is more dense, with a higher R value per inch, and reduces air circulation better than fiberglass. See: Roxul ComfortBatt Model # RXCB351525, Home Depot Internet # 202090820 Store SKU # 974419. Spray glue on the shell will keep the batts in place.
The "thermal bridge" created by the aluminum frame touching the interior is another key problem, because aluminum is such an efficient conductor of heat. Sacrifice a bit of interior space and install 1/2" or 1" thick pieces of PVC plastic trim as standoffs along the frame -- to hold the new interior surface away from the frame. This will also give you a bit more depth for insulation. Veranda PVC trim works well; just attach the pieces to the frame with metal screws. See: Veranda Cellular PVC trim, Model # H190LWS6, Home Depot Internet # 100265384 Store SKU # 252314
One last tip: When you disassemble the interior, be sure to wear a full 1/4 face respirator, rubber gloves and a full body Tyvek painter's suit. Rent or buy a vacuum with a HEPA filter. Why? Prior to the mid 1980s, trailers were often insulated with asbestos, which we now know is a nasty carcinogen. Keep kids away, carefully remove and bag any insulation you find, then vacuum the entire interior thoroughly. When you're done, carefully bag the contents of your vacuum, remove the filter and put it in the bag, and put your painter's suit and gloves in the bag too. Also remove the filter cartridges from the mask and throw them in. Then take a thorough shower. Here is the mask you should use: 3M Model # 62023HA1-C, Home Depot Internet # 202080144 Store SKU # 278310. DO NOT use any of the cheap white "dust masks" that cost a few bucks.

Comments
Post a Comment